FAQs - Sales Forms
FAQ - How do you set up sales that are tagged for a specific student?
There are two ways to configure a form or product so that the sale is tagged to a specific student versus at the family level. You want to choose one of these options when delivery of the sale is going to be done through the student and not the family, or when the sale needs to be tracked to the student.
Option #1 - At the Form Level
You can set up a form so that a new form will be created for each student in the database for that particular sale. For example, if you are selling school supplies, you may want to have a new sales form for each student. In the list of available forms the parent would see:
School supplies for Student ASchool supplies for Student BSchool supplies for Student C
Advantages:
This assures that parents see purchases need to be made for each student (such as school supplies or dues and fees). For forms with multiple purchase options (such as spirit wear), a new form for each student would be best.
- Go to Store & Forms > Forms > Select the form to edit or create a new one.
- Choose the Setup tab
- Under the Family/Student option choose "One Per Student".
Option #2 - At the Product/SKU Level
You can set up a SKU to present on a separate line for each student listed in the family.
Advantages:
If there is only one product (SKU) on the list that needs to be presented to each student, a best practice is to control this at the SKU Level versus the entire form (such as yearbooks or dues and fees). Simple is best! You want to control the amount of scrolling users to your site need to do.
- Go to Store & Forms > Forms > Select the form to edit or create a new one.
- Choose the Products & Data Fields tab and select "edit" for the appropriate SKU.
- Choose the Form Specific tab.
- Under the "Present a row for each student?" option, select "Yes".
 FAQ - If a User chooses to skip a form, can they get it back?
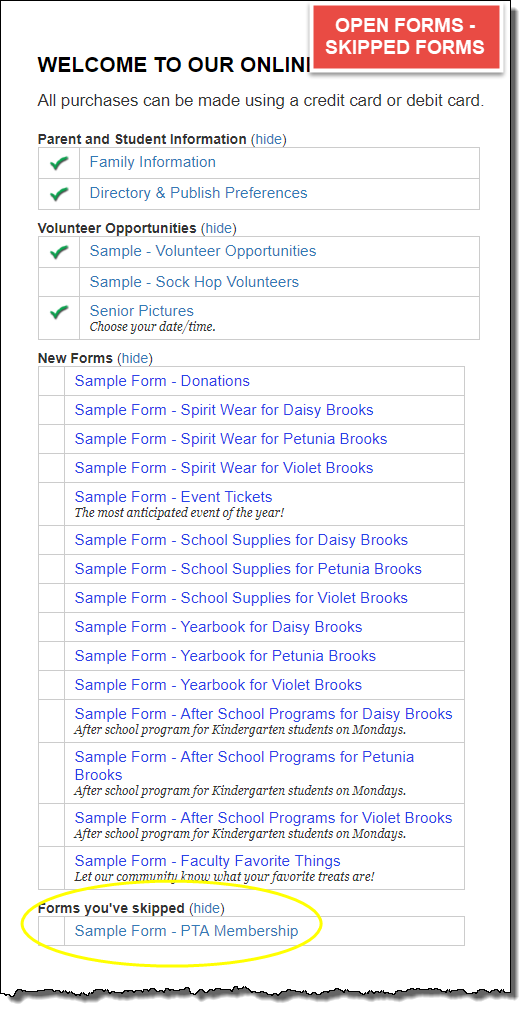
At the top of order forms there is the option for users to select "I'm not interested in this form". When this is selected the form's status becomes Skipped. Forms that have been skipped but are still active can be retrieved.
From the list of Open Forms, scroll to the bottom and there will be an option to view skipped forms. Select "Show" and you will be presented with the list of forms that have previously been skipped.
FAQ - How can I create a "Contact Us" form?
There are times when you might have a need a way for users to contact you with suggestions or concerns. For example, you might want parents to provide suggestions for fundraisers they'd like to do.
The best way to do this is to create a 'Data Only' Guest Form. We have a sample form available that we can add to your account to help you get started. Just submit a ticket with your request through our help desk.
- You can edit, delete, and add data fields on the Line Items tab.
- We also suggest entering a CC'd email address on the Email tab so someone is notified when the form is submitted.
- Once you make it Active, remember to provide a direct link from another area of your site (this link is found on the Overview tab when editing the form.) You can also choose to have it available in the Open Forms list for users that are logged in.
FAQ - How can we keep up with who has received items that are free with purchase?
The best way to do this is to set up or edit your SKUs so that they are deliverable. This way you can go into each order and mark it as delivered once delivery has occurred.
Membership SKUs are typically set to be non-deliverable, but you can edit each Membership SKU within the Sales Information section so that you can track the "free gifts with purchase."
You can check the numbers that have been/need to be delivered by going to: Store & Forms > Reports > Ordered Items.
To mark many orders as delivered at one time without opening up each order go to: Store & Forms > Reports > Fulfillment Worksheet. You can filter by the SKUs you plan to deliver items for.
FAQ - How do I edit the sales price of an item on a form?
There are two ways to edit the sales price of an item - from the Form itself and from the Catalog.

Keep in mind: Changes made at the form level will NOT be reflected in the catalog for that SKU.
To Edit Sales Price on a Form:
- Go to Store & Forms > Forms and select the Form you wish to edit.
- On the Products & Data Fields tab, select the SKU you wish to edit.
- On the Product Description tab, select "Yes" to Override the Catalog.
- On the "Sales Information" tab, enter your new Sales Price.
To Edit the Sales Price in the Catalog:
- Go to Store & Forms > Catalog and select the SKU.
- Edit the price on the Sales Infomation tab.
FAQ - How do I make a data field required?
If you want to make it so users are required to fill out certain data fields on a form:
- Go to Store & Forms and select the appropriate form.
- Select the Product & Data Fields tab.
- Select the 'edit' button next to the appropriate data field.
- Select the Presentation tab.
- Allow Blank? - Select 'No - Require Input.'
- Error Message - This is the message users will see if they leave the field blank.
FAQ - How do you change the deadline on a form?
- Go to Store & Forms and select the form you would like to edit by clicking on the Form Title.
- On the Setup Tab you can change the form Publish and Unpublish dates.
FAQ - How do you create a form only available to faculty members?
1. Create a custom field that captures who in your database is a member of the faculty. This can only be done by a Membership Toolkit Team Member.
2. Add a form condition to the form.
- Select the form you want to edit.
- Go to the Form Access tab.
- Click the "+" sign to create the condition.
- Use the drop down menus to select the fields and restrictions.
- You can have multiple form conditions on a form.
FAQ - How do you turn off the email receipt for 'data only' forms?
When a sales form only contains data fields, it might not be necessary to send a receipt to the user after they submit it. To turn off this email receipt:
- Go to Store & Forms > Select the Form to Edit > Email tab.
FAQ - Is there a way to preview and test our forms?
Yes! From the Store & Forms tab, select the form that you would like to test, go to the 'Setup' tab, then set the Form Status to 'Test.' (Be sure that your publish and unpublish dates are current.)
To view/test the form, go to your Open Forms (My Account) page and click on the form. Forms that are in Test Status will show up highlighted in yellow. You can fill in data, make purchases, etc.
- Only Administrators with Dashboard Access can view forms that are in Test Status.
- All purchases made while a form is in Test Status are deleted when you go to checkout.
If your form is set up as a Guest Form, you will not be able to preview/test it in Test Status - you will need to set the form to Active.
FAQ - Why are some forms highlighted yellow in the list of open forms?
Forms that are highlighted are in TEST Status and are only available to account administrators. While the form is in Test Status, all purchases and activity on the form will not be saved.
FAQ - Why does a form show up as 'new' instead of 'completed'?
This is controlled by the form re-use settings at the form level. If the form is set for 'as many as wanted' it allow users to purchase items from this form multiple times. When a form is set to 'as many as wanted' each time the user logs in the form is loaded as a 'new' form.To change this setting:
- Go to Store & Forms and select the form.
- Click on the 'Setup' tab and change the Form Re-Use to 'One Time Only.'
- Once the user has submitted the form, it will not show up again.
FAQ - Why is my drop down box presenting as a space to fill in a quantity instead of presenting choices?
This happens when you have not set the minimum and maximum quantities.
- Go to the form and edit the product/SKU on the Products & Data Fields tab.
- Under the "Form Specific" tab verify what quantities are set for minimum and maximum. To get a drop down menu, you must fill in a maximum value.
Related Articles
Creating and Editing Sales Forms
Creating a Sales Form Sales Forms can be set up to sell products, collect donations, and to capture data. There are a few basic steps to follow for creating a form: 1. Determine if you are going to start a form from scratch or copy an existing form. ...Advanced Forms
Setting Up a Lunch Order Form Many schools have the need to have an online ordering system that allows parents to prepay for their child's lunch, giving them the option to choose the variety and amount and choose to pay for the entire semester or ...Sales and Form Reports
There are several reports that capture sales. Form Report This report includes all data specific to this form including data fields and time of purchase. Find your form on the Store & Forms tab. Select the blue "report" button next to the form or ...Data Forms
'Data Only' Forms are forms that have no products (SKUs) attached. They are made up solely of data fields and their purpose is to merely collect information. Turning Off the Email Receipt When a sales form only contains data fields, it might not be ...FAQs - Sales Reports
FAQ - Why is certain information no longer showing up on my report? Most likely a SKU was removed from a form or an option was removed from a SKU. When an option is removed from a SKU, that option will no longer appear on your sales report. For ...